The FireBrick has a lot of features, and fully understanding some of these needs some detailed understanding of networking. However, for most people with basic IT skills the FireBrick is quick and easy to set up.
This user guide provides and overview of what the FireBrick can, and how to get started. There are a lot of technical papers on specific aspects of the operation which make for good reference reading later.
You can think of it as something akin to a Swiss army knife for networking. It is a firewall, to protect your network from direct attack over the internet. It provides means to filter and map and change network traffic. It provides means to control the speed of different types of traffic. It can be used to allocate network addresses to machines on your network. It can manage multiple networks at once.
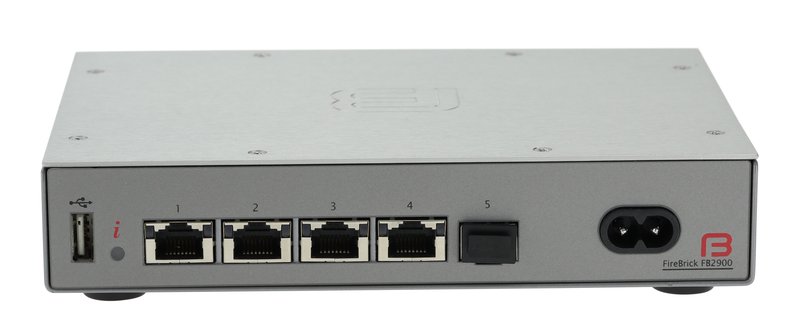
The FB2900 and previous FB2700 and FB2500 models are very similar. The FB2500 and FB2700 both have four network ports that work at 10M, 100M, or 1G. The FB2500 can route traffic at up to 100Mb/s whilst the FB2700 is faster (typically up to 350Mb/s) and the FB2900 faster still (typically up to 750Mb/s). The other advantage the FB2900 and FB2700 offer is that it can take selected 3G or 4G dongle (plugged in to the USB port on the front) - this is ideal for mobile data connections which are typically used as a back up for a DSL line.
Both have either a base model or a fully loaded model. The base model lacks a few of the features such as BGP, L2TP and various bonding features.
In most cases people use the basic features such as routing packets, filtering (firewalling) and managing IP addresses on an office network. Some of the more obscure features come in to play when you need to do something extra - such as announcing addresses to an upstream provider by BGP, or arranging a 3G fallback for your DSL line.
The FB2900 Quick Start Guide is included with your FireBrick and covers the basic set up. You can either connect a PC to the FireBrick and have the PC get an IP address from it, or you can connect the FireBrick to your existing network and have it get an IP address from your DHCP server. Either way, having done that, you simply access the web interface using the IP address.
The first thing you will notice is that you are asked to fill in a form with a username and password and some other details as a "wizard". You can add lots of users if you wish, and can set different levels of access.
The XML config guide goes in to a lot of detail about the configuration. All of the configuration is held in a single file, which is in XML format. However, the FireBrick has a built in web based configuration editor as well. This allows you to make changes to the config, and when you are happy you send the changes to the FireBrick.
We recommend that beginners use the web based config editor (select Config and then Edit on the menu on the web page). You can safely play with the config, adding new objects and changing settings as much as you like. The config only goes to the FireBrick if you press the Send button. So feel free to just have a play around to start with. Most settings have a tool tip if you hold the mouse over them, and this can help explain the settings. There is also an option on the bottom of most pages to Show all attributes - this shows hidden extra attributes normally only needed for more complex or advanced applications. You may want to look at this later.
The config itself works by lots of objects each of which have a set of attributes. This is a reflection of the underlying XML format used. Objects can have lists of other objects in them as well.
The factory reset configuration has some basic network interfaces and subnets defined and some example settings for PPPoE. It also has a basic firewall setting.

The ports on the FireBrick are numbered 1, 2, 3, 4 and 5. In the factory reset config you may see these listed as PORT1, PORT2, and so on. You can however change these names if you like, and you can group ports together. You might, for example, want ports 1, 2 and 3 as a LAN connecting to machines in your network and port 4 as a WAN connecting to an external router to a DSL line. You can exit the port definition, deleting entries you don't need, and changing names and lists of ports that apply. You cannot overlap ports.If you do group ports together, e.g. 1, 2 and 3 as LAN, then this is treated as one port group elsewhere in the configuration. The ports in the group work as a network switch, transferring traffic between the ports directly at full speed (a gigabit if you have gigabit devices plugged in).Each port group can be set up as an interface on the FireBrick, which has an IP address and subnet mask. In fact, you can have lots of interfaces by using a port group and VLAN tag together, allowing lots of logically separate virtual LANs on each port group. Simply make interface objects and select the port group, adding a VLAN tag number if you need. Each of these interfaces then has one or more subnet objects in it. You will see the example config has some subnets on the first interface which is on PORT1 with no VLAN tag.Each subnet normally has one or more IP and subnet masks. The IP can be an IPv4 or IPv6 address, and the mask is specified using CIDR notation, i.e. a slash and bit length. So 192.168.0.1/24 means the FireBrick's IP is 192.168.0.1 and it is on a 24 bit subnet mask (256 addresses, sometimes shown as 255.255.255.0).
If you want the FireBrick to get an address automatically, you simply make a subnet with no IP addresses defined. You can then see on the web interface under Status what subnets are in use, and what IP addresses have been allocated.
If you want the FireBrick to give out addresses to machines on your network, you create one or more dhcpobjects in the interface listing the ranges of IPs to allocate. There is an example of this in the factory reset config.
Once you have decided on the ports or port groups and your subnets, you probably want to think about firewalling.
The FireBrick is very flexible in this, and it can get quite complicated if you are not careful. In a simple installation with a WAN side and a LAN side, you just want some filtering for traffic from the WAN, and that is relatively easy to do. There is a simple example in the factory reset configuration.
Basically, you create a rule-set object. You could just have the one rule-set if you like, for firewalling. Each rule-set is actually checked in order, and if the entry criteria match then the rules in the rule-set are checked, in order until a match is found. Typically the rule-set has a no-match-action such as reject which means if no rule matches the traffic is not allowed. Then individual rules match what you want to allow. The rules don't need action setting if they are allowing the traffic as the default is continue, which goes on to the next rule-set (if there is one) and then allowed the traffic if it gets to the end of the rule-sets without being dropped or rejected.
Another common requirement is to connect to a DSL line. This can be done using a normal DSL router which has a subnet, and gives an address to the FireBrick by DHCP. Typically a port is set up as WAN and the router connected. The FireBrick then uses the router as its gateway to the internet.
However, it can be preferable to have the FireBrick connect more directly, using PPPoE. This is also what you would need if your internet access is PPPoE such as BT's fibre to the cabinet and fibre to the premises services. The factory default config has an example for PPPoE connectivity.
Basically, you pick a port on the FireBrick (typically port 4) for this. You don't actually need to set up an interface and subnet for this. If you have a router then set it to do PPPoE before hand (typically PPPoE bridging mode).
You then have a ppp object stating the port group (e.g. port 4) for the PPPoE, and the username and password provided by your ISP. The FireBrick then connects and gets an IP address automatically, using the PPPoE link as its gateway.
If you have BT FTTC or FTTP you can also add an mtu setting of 1500 rather than the default of 1492 as BT support this and it is slightly better if you can use proper 1500 byte MTU. However the default 1492 is fine if not.
If you have an FB2700 or FB2900 then you can also connect selected dongles. If using PPPoE then that will take priority over the dongle automatically, but if the PPPoE link goes down then the dongle is used. This provides a simple 3G/4G backup.
To configure the dongle you add a dongle object. Generally dongles do not need a username or password, but you can set these if your ISP says you need to. Similarly the APN is usually automatic, but some ISPs need that to be set. You can see the status of the dongle on the web pages under Status and Dongles.
By default the dongle creates a network address translation link. If your ISP can provide routed IP backup for DSL then you will need some slight changes, such as setting nat to false.
The FireBrick is also a full VoIP phone systems with a range of features. It can be you office phone system with ring groups and fallbacks, and work with a range of external VoIP carriers and VoIP phones.
You can set a graph setting on things like the dongle, and PPPoE links and interfaces. You make a suitable name for the graph for each. Then, if you look at the Graphs section on the web interface you can see what traffic is being sent and received.
You can see logs on the web pages under the Status section. Most things can have a log setting. By default there is a default and fb-support log defined. The fb-support one need not be touched - it is there to allow any software problems to be emailed to the development team automatically. You can remove it (and the log-panic setting in the system object that references it) if you like but we recommend allowing such logs to be sent as they help the team fix problems.
If you select the default log on things like the ppp object then you get logs of the ppp connection being made. Most things allow a log-debug as well which provides much more detail in the logs.
One of the most useful things to log is the rules in the rule-set. Just set the log, either on the whole rule-set or on specific rules.
You can make other log types by adding more log objects and set different aspects of the system to go to those new log types. Normally the log is simply visible on the web pages, but you can have it emailed or sent by syslog if you wish using settings in the log object. The fb-support log object is a good example for emailed logs.
The FireBrick can do a lot more. Read some of the various Knowledge base articles and the manual for more details of different aspects of the FireBrick. If you really want to know all the details - consider one of the training courses.